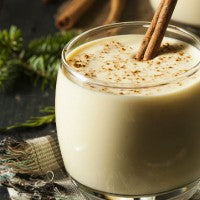
Can this really be done? As I sat down researching and rummaging through some of the most inspirational health food blogs I know of in search of the bits and pieces of perfect a vegan eggnog, I can say that at first I was concerned. After all, it is specifically called EGGnog! How could I replace the “egginess” of this classic drink and make one suitable for vegans, those allergic to eggs, or anyone who just doesn’t like them? Needless to say, the proof is here. I have done the impossible!

Guilty Indulgence or Nutritious Delight?
What most of us know as eggnog is more often viewed as a completely unhealthy treat that will make you gain weight just by looking at it. Luckily, that isn’t the truth for this tasty yuletide beverage. Now, if you’re purchasing eggnog from the store, this is probably true. Not only do store-bought eggnogs contain poor quality factory-farmed milk and eggs, but you’ll very likely find it to be full of refined sugar and weird preservatives as well.
With this recipe, you will be able to take charge of your health this holiday season. By making your own homemade eggnog, you get to decide what goes into your body. As a health coach, I have naturally developed some chef skills, and I’ve learned a healthy and delicious recipe starts with the best ingredients. You can be a great cook, but if the ingredients aren’t any good, the recipe won’t be either. By choosing optimal ingredients that are fresh, nutrient-dense, and grown organically, you can rest assured your final product will pack a healthy punch.
The Recipe
I don’t see the point of doing anything less than 100%. When we leave things half-done, or un-done, we build a traffic jam up in our minds. When we give our full attention to our work as it comes to us, we thrive. The best way to avoid these mental pile-ups down the road is to complete work fully when it comes our way, even when it comes to something as simple as a recipe.
Think of processed food: it’s been made with no awareness and so shows us as nutrient empty. When you make your food with full, loving awareness, you will be sure to leave nutritionally, emotionally, and mentally fulfilled. The recipe below embodies this same love and attention, and because of that, I split this up into two parts.
Ingredients:
- 1 cheese cloth or nut milk bag
- 2 cups filtered spring water
- 4 tablespoons raw coconut butter
- 1 cup desiccated coconut
- 1 teaspoon vanilla bean powder
Directions:
In a high-speed blender, like a Vitamix or Blendtec, add the water and desiccated coconut and blend for 60 seconds. Pour contents into nut milk bag and strain into a large glass container. Save the dried coconut for healthy baked goods later.
This will give you a base. To make it creamier and even more like actual “milk” used in traditional eggnog, were going to blend the raw coconut butter into the coconut mylk base.
Add base back into blender with coconut butter and vanilla bean powder then blend quickly until creamy. This is your final base.
Part 2: The NOG
Ingredients:
 2 tablespoons Warrior Blend vanilla (This will work as a vegan source of protein, healthy fats, and more creaminess to substitute the dairy and eggs.)
- 1 teaspoon fresh nutmeg (Freshly ground nutmeg is the difference between good eggnog and an eggnog worth remembering.)
- ¼ cup coconut nectar or liquid stevia, or raw honey if not worried about being strictly vegan (For anyone with sugar issues such as diabetes, hyper/hypoglycemia, candida and other digestive issues I suggest the use of Stevia.)
- ½ teaspoon cinnamon
- ¼ teaspoon cardamom
- ¼ teaspoon clove
- Optional: 2 tablespoons raw coconut cream [Between the fresh made mylk and added coconut butter you should have enough creaminess. However, raw coconut cream is a totally different ball game compared to coconut butter. This stuff is incredibly creamy, rich in enzymes, probiotics, and more. It chelates heavy metals and detoxifies the internal organs. It’s optional as it can more of a challenge to source. If you desire more creaminess without it, just up the coconut butter.]
Directions:
First, using a hand grater, grind your nutmeg.
Add two cups of your coconut mylk back to the blender for the final spin. Add your dry ingredients plus sweetener then whip together until frothy.
Pour into mugs and garnish with more freshly grate nutmeg and share with a loved one!
You can warm your coconut mylk if desired. I suggest the used of homemade coconut mylk because it can withstand higher temperatures and blending over other nut mylks, which are more delicate fats. If you want your eggnog warm, simply heat it up in a pot on the stove top, being careful to not bring it to a boil. Then continue with steps three and four as written.
Enjoy!


